Showing posts with label Christmas. Show all posts

30 November 2012

Classic Christmas Wreath

For the third consecutive year I am participating in Craftaholics Anonymous' handmade gift exchange. My partner this year is a girl from Oklahoma. She doesn't blog so I cannot take a sneak peak in her life and get a feel for her tastes. That's okay, I like giving creativity free rein and see where it takes me.

This year it took me to a wreath. Which is funny because while I love wreaths, I never have the patience to actually make one. Until now. It is a moss covered wreath with felt holly leaves and berries, and a few snowflakes here and there. With my current obsession for natural colors, I started out with all white but it didn't feel right. Classic Christmas colors it is, then.

I hope you love your present, M. Merry Christmas!


16 November 2012

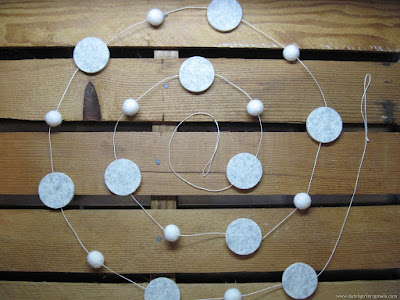
Winter Garland

I have fallen in love with Scandinavian Christmas and winter décor. At present I read about five or six blogs from Denmark, Sweden, and Norway. The language barrier is not a problem, I let the pictures speak for themselves. If the need arises, there’s always Google Translate.

The elements of nature, the warm winter white, the use of galvanized materials; I plan to incorporate it all into my Christmas decorations this year. Perhaps I’ll add a touch of red here and there. Except for the tree, that is and always will be a very colorful collection of memories.


I am linking my winter garland up with:

Friday’s Nature Table at The Magic Onions
Creative Friday at Natural Suburbia

04 October 2012

Candy Cane Lane

The minute I signed up for a craft show, I was offered a job. Relieved yet reluctant, I traded in my craft room for an office, and my felt for a notepad. But I have committed to being part of our local Fall Festival, and I am sticking to my word. So I have a smaller booth, who cares. As long as I am having fun, right?

However, crafting because you have to sort of feels like a chore. I was not having as much fun as I hoped for. As I was churning out the ornaments, garlands, and gnome homes, I caught myself thinking "I'll be glad when this is over." Spending every evening in my craft room after a full day's work is starting to take its toll.

But then...

I have had this idea in my head for months. It started as a gnome home but my choice of felt colors made it clear this home is not just for any gnome. No, this is where Santa and Mrs Claus live. This house sits on Candy Cane Lane.

It needed to be finished still and its residents needed to be dressed (with a little help from Wee Folk Art for Santa). But when it all came together, I instantly remembered why I love doing this so much.


Lola is going to be tickled pink when she wakes up. There is no way this one is going to the fair or the shop.

Candy Cane Lane


I am linking the Claus's and their abode up to:
Creative Friday at Natural Suburbia
Friday's Nature Table at The Magic Onions

29 December 2011

Christmas On The Front Porch


We have a large screened-in front porch that is only used in the summer. We always come in through the back door. Even the UPS guy and the repairmen know to go around back.

But the space is too lovely not to decorate for Christmas. The green and red of the branches from the backyard and the berries from across the road frame the gray and white of my vintage finds nicely.


Isn't it lovely? If the weather were a little nicer, I would sit out there all day.

27 December 2011

Stick Horse

My grandfather was a craftsman who liked working with wood. He made my grandmother a hutch once but mostly he made small things like coffee filter holders, jewelry organizers, and toys. The only memory I have of celebrating St. Nicholas as a believer was the year I received a handmade doll bed. It was made by my grandfather.

Lena, the horse
I am my opa's granddaughter. This year for Christmas I made Lola a stick horse from scratch. I am very proud of myself and I know opa would have been proud of me, too.

I found a template at Bluebonnet Village Craft Network. I free handed it onto paper, and traced the drawing with a sharp knife onto wood, leaving a faint imprint of the horse's head which I traced with a marker.

After cutting out the head with a jigsaw, I sanded it until it was nice and smooth. I drilled holes for the eyes, the handlebar and the stick (both made of a 5/8" dowel), stained it a warm chestnut brown and applied a protective coat of polyurethane.


The eyes are bear eyes, found at the goodwill but available at any craft store, stuck into place with a little glue. The hair is made of three Dollar Tree chenille dusters. I took the fabric off the plastic handle, cut off the elastic, and with help from my husband hammered them lengthwise onto the head.

The ears were cut out of soft suede which I had on hand. They are about four inches long. They were a little too floppy for my taste once they were hammered into place so I stitched them together to keep them upright.

Lola found the ribbon I had intended for the reins. I tried a thin leather strap from an old purse as an alternative but it didn't really work out. My solution in the end was to let Lena, as Lola named her horse, run free. Should Lola want reins, I can always suggest using this beautiful ribbon I happen to have lying around...

Lola is very happy with her horse. It is a little bit too tall but that is an easy fix. Giddy Up!

Pin It


I am linking Lena up with:
A Little Birdie Told Me at Rook No. 17
THE BEST OF 2011-Its Party Time at Its So Very Cheri
A Pinteresting Link Party at Here's to Handy Andy
Show and Tell at Blue Cricket Design
Whatever Goes Wednesday at Someday Crafts
Strut Your Stuff Link Party at Somewhat Simple

07 December 2011

Doily Snowflake Ornaments


We are still waiting for snow up here in the Northwoods. But since the temperature has dropped to freezing, both day and night, I made my own snowflakes by freezing doilies in baking pans and hanging them in the trees in our backyard. It couldn't be more simple.

I used boiled water, cooled, because it results in clearer ice. The only tricky part is making a hole in the ice once the doilies have frozen. I used a hand drill but any sharp object will do. Just don't go too fast or push too hard. Thread the ornament with string and hang from a branch. Watch them sparkle in the sunlight. Beautiful.


I am linking up to A Little Birdie Told Me at Rook No. 17.

03 December 2011

Felt Heart Garland


I didn't really know what I was going to make for my gift exchange partner in my second Handmade Gift Exchange hosted by Linda of Craftaholics Anonymous, I waited for inspiration. I found it, where else, on Pinterest. I saw a picture of a bowl with red and gray ornaments, including a little gray felt heart with a red blanket stitch. A short trip to the local craft store later I had everything I needed: felt, polyfil stuffing, thread, and a needle.

I cut out a paper heart template by eyeballing it. My heart is about two and a half inches high and two and a half inches wide. I cut out my felt hearts by folding a strip of felt over, laying the folded template on the fabric and then cutting around it. Pinning the felt to keep it in place makes it a little easier to cut out the hearts but they are small enough to just hold in place with your free hand.

An 8 by 11 sheet of felt yields twelve felt hearts for six finished hearts. Once the cutting is done, it is simply a matter of stitching around with a blanket stitch. If your blanket stitch skills are rusty like mine were, here is a clear refresher course. Leave about an inch to stuff the heart with polyfil, then close it up.

My garland turned out to be about six feet long, using thirteen gray hearts and one red one. In between I strung felted wool balls, alternating wool white with red. To keep everything from moving, I tied knots on either side of the the hearts and balls. I don't really think it's a necessary step, though. And since it was an annoying one, I recommend you not do it.

And voilà, there you have it. A felt heart garland. I am very happy with how it turned out. And I am proud to report I am not alone in this. I have been commissioned for the first time ever to make one for a friend. And Craftaholics Anonymous featured my garland this week.

30 November 2011

Wreaths

I love wreaths, especially around the holidays, but lack the patience to make them. Instead I scour flea markets and the aisles of Goodwill and other local thrift stores to breath new life into discarded beauties. My collection is growing and it is starting to look quite festive around the house.

My Handmade Gift Exchange partner Heather surprised me with a gorgeous specimen made of rolled up vintage paper and an antique ornament. I love it! Thank you, Heather. And Merry Christmas!

25 July 2010

Christmas In July

I have been walking around with an idea for Christmas ornaments since last November, but had not been able to find the time or the supplies before this week. There is a lot of Christmas in July currently going around on the web, so now that I have everything I need, including a whole day to myself, I thought I would join in on the fun.

I purchased twenty three inch long colonial chandelier crystals a few months ago.


I love the shape of them, and my idea was to decoupage vintage Christmas images behind them. Since they are quite narrow, it wasn't as easy as I had anticipated to find the right size image. Until I stumbled onto an ArtChix collage sheet at Bello Modo. Twenty long and narrow vintage images, absolutely perfect for my project.

Making the ornaments is fun and easy. Begin by cutting out the images to fit the crystals, using scissors or a paper cutter.


Apply some Perfects Pearls with a small paintbrush for a nice shimmer. It can be used wet or dry, I just dry brushed it on.


Decoupage the image to the back of the crystal, using Mod Podge or any clear drying glue. Once it has dried for about an hour, add some silver leaf to the back of the image. I used liquid silver leaf that I found at Hobby Lobby, which turned out very nice. But to be honest, I think silver paint would have been equally beautiful and much cheaper.


Apply a clear coat sealer to protect the silver leaf once that is dry. If you accidentally get some clear coat on the glass surface, don't worry, a little acetone will take it right off.


Add some string or ribbon, and you're done. Beautiful handmade ornaments that make a lovely and inexpensive Christmas gift when the time comes. I have put them all away for the next five months. Never before have I been this organized, and I am quite proud of myself.